Getting Started #
Flashing your printer firmware is pretty easy once you go through the installation steps one or two times. We’ve simplified the firmware setup as much as possible so you don’t have to be an expert with code. Our firmware allows you to get more control over your printer, make repairs easier, add on upgrades, and really get into tuning your machine to make it print better.

The firmware update consists of downloading the firmware itself, opening it in Visual Studio Code, setting the options for your machine, compiling it, and then uploading it to the printer.
LCD Compatibility Note #
Currently, only the 12864 LCDs work 100% correctly with this printer and board. We have a kit here to do the conversion. The stock color LCD can be glitchy but functional due to limited support in Marlin for those LCDs at this time.
Flashing the Color LCD #
Only the DACAI and DWIN LCD types are supported. The other types are not and will not be supported. If your machine has a non-supported type you will need to replace the LCD with our LCD kit for your printer. You can find all our LCD conversion kits on our website here: LCD Upgrade/Conversion Kits – TH3D Studio LLC
Not sure what LCD you have? Click here to see our article on identifying your LCD type: Creality Printers – Color LCD Types – What Works and Doesn’t Work with Unified 2
- In the firmware download, there is a folder called “LCD Firmware”. Open that folder and then open the folder labeled “DWIN DACAI Color LCDs”
- In there is a ZIP file called “DWIN_DACAI_LCDUpdate_TH3D_X.X”. Extract the ZIP file to a blank, FAT32 formatted w/allocation size of 4096 (4K) MicroSD card.
- The files must be extracted to the ROOT of the MicroSD card. If they are not the firmware will not update.
- Power the printer off and remove the LCD from its snap-on bracket.
- On the rear of the LCD, there is an SD slot that you access by removing the 4 screws on the rear of the casing.
- Insert the MicroSD card with the files on it into the LCD.
- With the LCD cable connected to the printer and the MicroSD card inserted into the rear of the LCD turn on the printer. You will see the LCD change from black to blue to orange. Wait 30 seconds after it turns orange and then power off the printer.
- If you have the DACAI LCD the LCD will show the text progress of the update.
- Remove the MicroSD card and re-assemble the LCD
- Turn the printer on. You should see our logo and the Marlin logo when you power on if the firmware updated successfully
Board Compatibility #
This firmware is for the aftermarket Creality V4.2.7 Board. This board does NOT need any special folder structure for its firmware to be flashed.

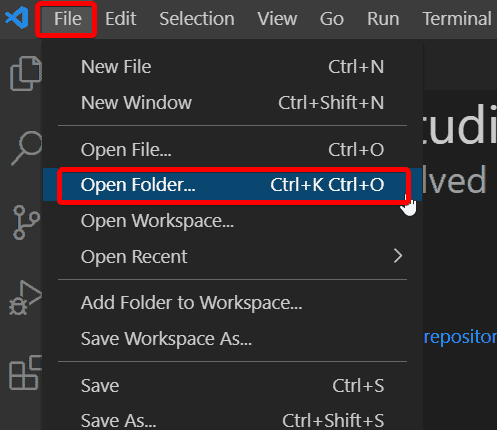
Setup Visual Studio Code First #
If you have not already installed and set up Visual Studio Code to compile the firmware please see our guide on how to do that before continuing. Click here to open the guide that we’ve written for you.
Download #
In the firmware download below you will get a ZIP file. Extract this to a folder on your PC
We also recommend you download the Unified 2 STL pack as well. This contains EZABL mounts, Gantry leveling Blocks, Solid bed mounts, and Bed Level test files.
Cloud Storage Note: Extract to a folder that is NOT in a “cloud” storage folder. Many users have reported issues using the firmware when the folder is in a cloud storage folder.
Using the Firmware #
Things to read BEFORE Starting #
File Locations #
Many users have been having issues due to odd folder setups on their computers. If you do not follow the below advice the firmware may have issues compiling.
- Do NOT put the firmware folder in a cloud storage folder (OneDrive, Google Drive, Dropbox, etc.)
- Do NOT use weird folder names (aka ones with anything other than letters and numbers)
- Do NOT use very deep paths. We work out of a folder on our main drive with a subfolder for the printer we are working on. Example: C:\Printer Firmware\MyEnder3\
Marlin Auto Build #
Our firmware does NOT use Marlin Auto Build. Do not use Marlin Auto Build with our firmware. Use the directions below instead.
Multiple CPU Support (If Applicable) #
Certain firmware packages are designed to work with different types of CPUs on the same board or printer models. You can find information about this in the Configuration.h file, located at the top of your machine’s settings.
To check if your board can use different CPU types and if you need to make changes to the firmware setup or platformio.ini file, simply look at the beginning of the Configuration.h file for more information.
Video Guide #
We now have a video guide you can follow as well.
Opening the firmware in Visual Studio Code #
Once the files are extracted you will need to open the folder in Visual Studio Code. You must open the folder named Firmware and not any other one. Failure to open the firmware at the correct folder level will result in it not working.
First time using our firmware or having issues? Watch our video that is intended to clear up common mistakes people make when opening and using the firmware here: Unified 2 VSCode Tips for Noobs | EZTip #8 – YouTube
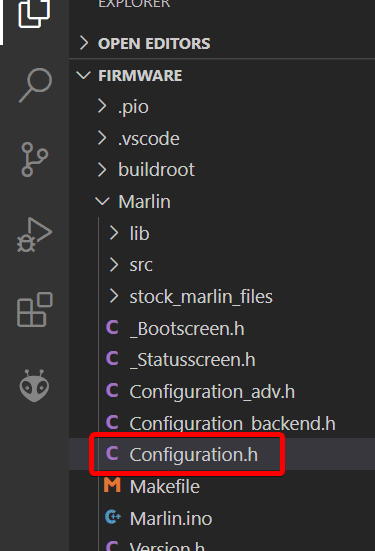
Once the folder is opened, you will expand the Marlin folder on the left and side and then double click on the file called “Configuration.h”. This file is where you will set up the firmware for your specific printer.
Editing The Configuration.h File #
In the configuration.h file there are printer models you can uncomment to tell the firmware what machine you are setting it up for. Uncomment means removing the // in front of a setting and you will be left with #define XXXXXX if an option is enabled.
There are many other options in the firmware for setting up upgrades, tuning, and other features. Read through the files configuration section to see all the features we’ve put in the firmware for you.
We have an article here with more details about the use of the configuration.h file.
Testing the Firmware Settings #
Once you have all the options you want and your printer model setting uncommented now it’s time to make sure it compiles with no issues. To do that just click the ✓ at the bottom-left of Visual Studio Code and it will build the firmware.

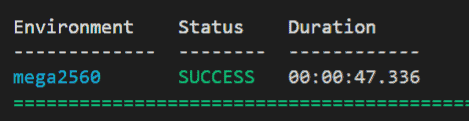
If the build succeeds it is ready for you to upload to your printer. You will know if it was successfully built because it will show a SUCCESS in green at the bottom of the window in Visual Studio Code.
Flashing the Firmware #
Upload the firmware to your board (SD Card Method) #
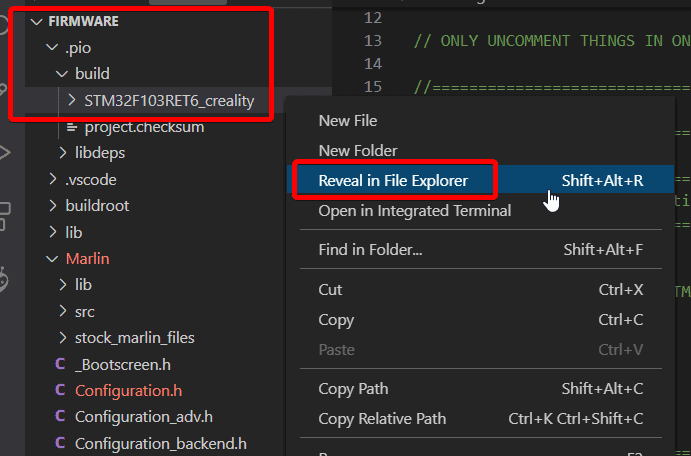
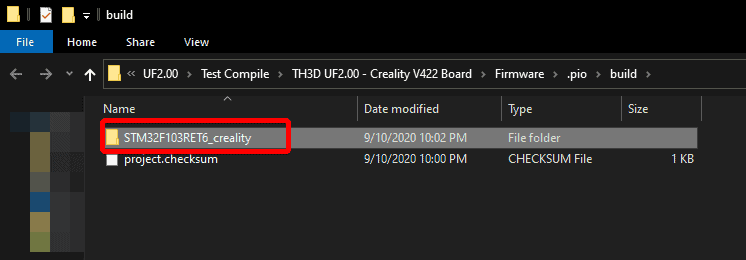
Now that we have the firmware tested we can upload it to your printer. Your particular printer uses a SD Card to upload it to the printer board. The firmware will be in a folder that matches the CPU name in .pio > build > CPUNAME. There will only be ONE folder in the Build folder so you just open that folder. Your folder name may be different from the picture shown below. You can open the folder by right-clicking on the folder for your board’s CPU and clicking “Reveal in File Explorer”.
Different printers/boards will have different .bin file names but they will all end in the .bin file extension.
Once you locate the .bin file for your board copy this to your SD card. This SD card MUST be formatted with FAT or FAT32 file system and most boards prefer a 4096 allocation byte size. Smaller cards (16GB or less) are better to use than larger ones for the best compatibility.

Power off your printer and put the SD card into your printer’s SD slot. Turn the power on. This will cause the printer to flash the firmware from the SD card to your printer CPU. This may take up to 1 minute on some boards.
DO NOT UNPLUG THE PRINTER. Interrupting the flashing can “brick” your board and if this happens you will need to reflash the bootloader with a programmer before you can flash again.
When the printer boots you may see the TH3D logo on your LCD, printers with low-end CPUs may not show a TH3D logo but all will show a Marlin screen with TH3D Studio showing on the version information.
Reset your EEPROM! #
Make sure to reset your EEPROM on your printer after flashing any firmware. You can do this from your printer LCD by going to Configuration -> Reset EEPROM or by sending an M502 followed by M500 with your favorite Gcode sender application.


