Intro #
Our EZFlex/EZMat/EZPei build surfaces are great for making sure you get that print to stick to the bed. If you are having trouble with either too much adhesion or too little check out the tips below to help you get the most out of our mats. These tips and tricks are based on our own experiences with the EZFlex/EZMat/EZPei as we use them on all our machines here.
PEI Products VS EZMat – Our EZPEI/EZFlex have a lower part adhesion when compared to our EZMat surfaces and should be used with a heated bed. If you do not have a heated bed and print only PLA then our EZMat would be the best solution as it grips very well for PLA even without heat. Materials other than PLA (or some TPU) will need a heated bed to adhere to any of our surfaces.
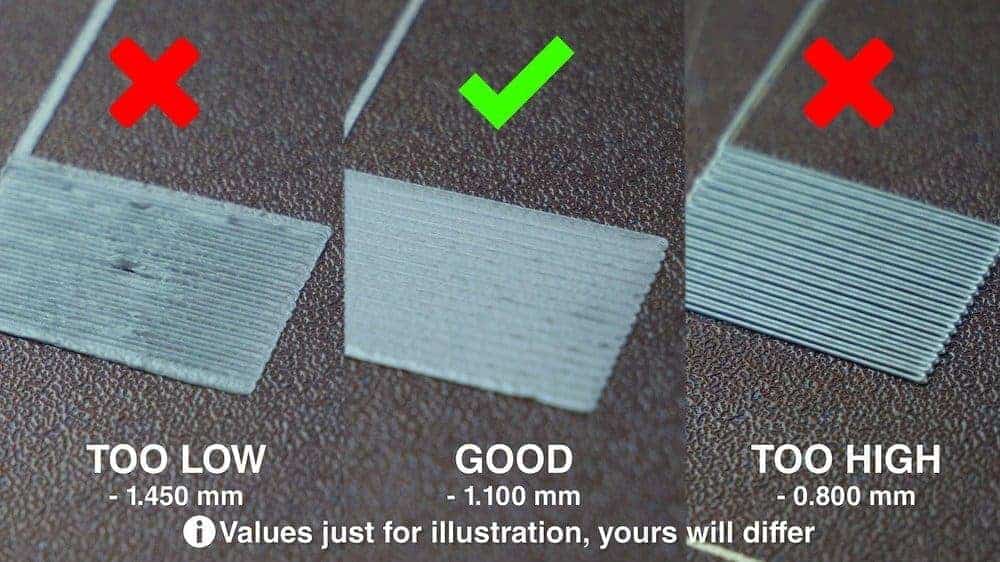
All of these tips and tricks are assuming that you have the correct Z height for your nozzle. If you are too close or too far nothing here will fix the issue of using a 3D printer with the incorrect z height.
Check out their article here on getting the perfect 1st layer: Nailing the First Layer
Removal Tools (EZMat) #
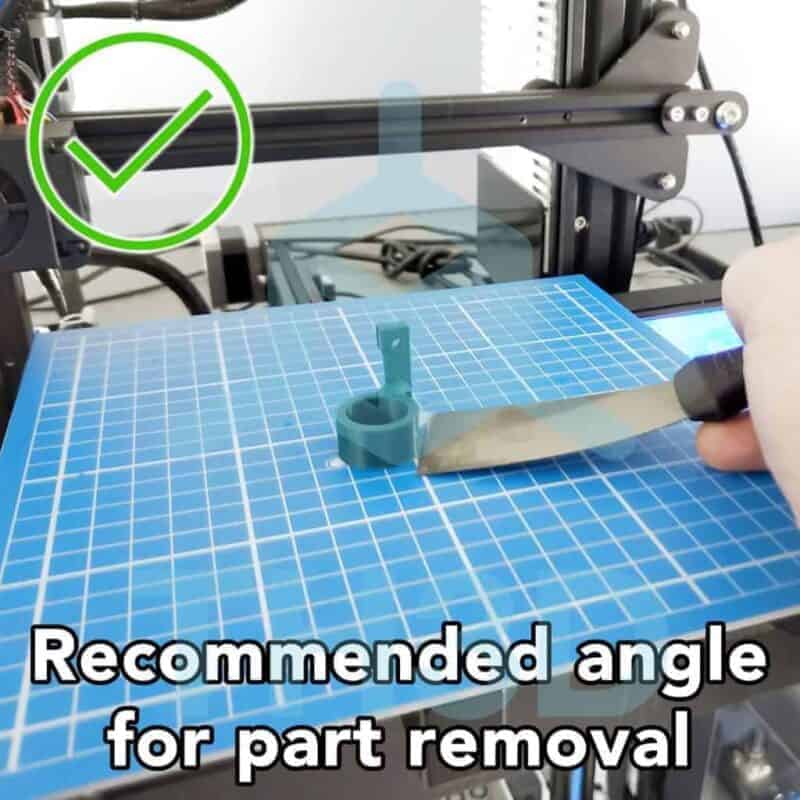
For using just our surfaces (aka not EZFlex) – removing the parts we recommend a sharp-ish scraper. We have taken scrapers that came with printers and sharpened them up with a sharpening stone. Below are the recommended products to sharpen your scraper and some scraper recommendations:
- Sharpening Tools
- Scrapers/Spatulas
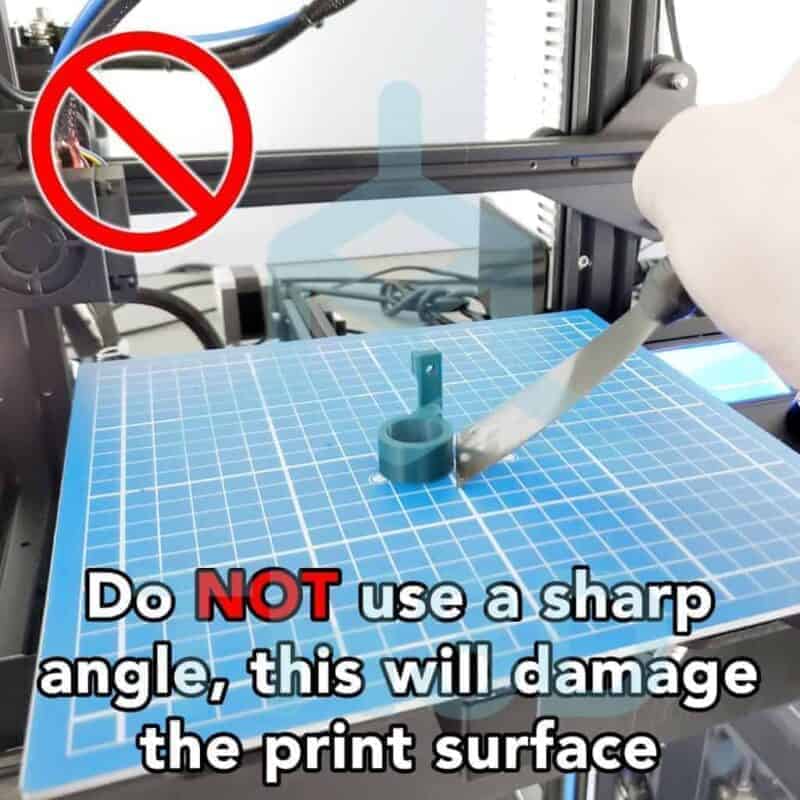
Make sure you do not use too sharp of an angle or you can run the risk of damaging the print surface.
Too Little Adhesion #
If you are getting too little adhesion this can be caused by a few things. Some filaments of the same type can vary in how they act between brands and colors due to different additives that each manufacturer uses. Below are some recommendations on increasing adhesion with different filaments
- All Materials
- Check your Z Height – If your Z height is too high the PLA will not adhere to the build sheet. Use the traditional paper method to establish the Z height to use. If you are using our Unified Firmware that has the BabyStepping Z feature (available even without an EZABL kit) you can tune the 1st layer while it is printing. To avoid messing with the part you are printing during the adjustment we recommend running a 2-3 line skirt 2mm from the print and use that to make your adjustment.
- Check your bed temp – We use 60C for PLA, 80C for PETG, and 100C for ABS on our bed mats but if you find that is too low try adding 10C to the print temp. The adhesive on the mats is rated up to 120C so you don’t need to worry about going too high.
- Increase Print temp for the 1st layer by 10C – This will make the plastic more molten when leaving the nozzle and give it better adhesion to the build sheet.
- Decrease print speed for the 1st layer – Decreasing the print speed will give the plastic more time to adhere to the build sheet since the nozzle has more time to apply pressure between the nozzle and the build sheet
- Clean the build sheet – If you have a new sheet make sure that there are no oils on the sheet from your hands or if you use a filament oiler. We use alcohol to clean the surfaces. We use filament oilers on our all-metal hotends when printing PLA and sometimes there can be small spots of oil on the sheet that will prevent the plastic from sticking.
- NOTE: Under normal conditions you do not need to clean off the sheet between prints.
- Sand the build sheet – Typically this is only applicable to sheets that have heavy use on them. Over time as you print and then remove prints the surface of the sheet can be smoothed out and the adhesion will not be as good as it was when the sheet was new. You can use some fine grit sandpaper or sanding sponge (https://amzn.to/2NB3tXy) to renew the surface. 100-500 grit works well. Don’t go crazy when applying pressure, a medium pressure works just fine. The sanding sponges are our preference as they allow you to apply even pressure across the surface so you don’t accidentally get spots that are more sanded than others.
- ABS, PC, Nylon
- These materials are ones that are high temp and also like to shrink when they are printed. These materials must have an enclosure (sometimes even heated depending on the filament, refer to the filament manufacturer documentation) to print successfully.
- If using our EZFlex you must use something like PVA gluestick or Vision Miner Nano Polymer if you are having issues getting ABS to stick. We use the Nano Polymer on our EZFlex plates with ABS in our printer farm.
Too Much Adhesion #
If you are getting too much adhesion this can be caused by a few things. Some filaments of the same type can vary in how they act between brands and colors due to the different additives that each manufacturer uses. Below are some recommendations on decreasing adhesion with different filaments.
- PLA
- Decrease your bed temp – We recommend 50C for the EZMat and 60C for EZPEI and that is what we use on our sheets here. PLA typically has a glass transition temperature of 60C. This means that around 60C PLA will start to get soft. Running a lower temp will decrease adhesion and save power usage on the machine as well.
- On smaller parts, you can even try not using any heat at all. Larger parts may need some bed heat to prevent warping but smaller parts do not typically need any heat as there is less plastic to shrink as it cools and pull off the bed. Try it with and without and see what works for you.
- Decrease print temp for 1st layer by 10C – This will make the plastic less molten when it leaves the nozzle and will make it adhere less to the build sheet.
- For the 2nd layer use your normal print temp for the rest of the print.
- Increase print speed for the 1st layer – Increasing the print speed will give the plastic less time to adhere to the build sheet since the nozzle has less time to apply pressure between the nozzle and the build sheet
- Decrease your bed temp – We recommend 50C for the EZMat and 60C for EZPEI and that is what we use on our sheets here. PLA typically has a glass transition temperature of 60C. This means that around 60C PLA will start to get soft. Running a lower temp will decrease adhesion and save power usage on the machine as well.
- PETG
- Increase the Z distance for the 1st later – If you run your Z height a little higher than you would with PLA or other materials this will make the nozzle not apply as much pressure and reduce adhesion between the plastic and the sheet.
- Decrease print temp for 1st layer by 10C – This will make the plastic less molten when it leaves the nozzle and will make it adhere less to the build sheet.
- Increase print speed for the 1st layer – Increasing the print speed will give the plastic less time to adhere to the build sheet since the nozzle has less time to apply pressure between the nozzle and the build sheet
- Use something between the PETG and the build sheet – PETG likes to bond to surfaces including our EZMat and most other mats on the market (and even bare glass itself). To avoid issues with too much adhesion you can put a thin layer of hairspray or gluestick down before starting the print.
- This should only be used as a last resort. We use the above tips here and do not use the additional hairspray or gluestick when printing PETG but sometimes it is easier to just use this method if you don’t want to mess with settings.
- ABS
- Increase the Z distance for the 1st layer – If you run your Z height a little higher than you would with PLA or other materials this will make the nozzle not apply as much pressure and reduce adhesion between the plastic and the sheet.
- ABS is the easiest to print on our EZMat sheets and aside from the Z height being too low there are no other things to watch for when printing this material.
- Increase the Z distance for the 1st layer – If you run your Z height a little higher than you would with PLA or other materials this will make the nozzle not apply as much pressure and reduce adhesion between the plastic and the sheet.


