If you are on a shared network where other people other than yourself could have access to your EZPi and want to prevent them from getting access to it there are a few things you can do to lock the instance down.
Change the Default Password #
To change the default password, load up the EZPi Web UI and login. Click the ezpi user account icon in the top right of the UI and then click User Settings.
In the dialogue box that opens, fill out the new password and confirm it. Once you have the new password entered and you have the new password stored for your future reference, click the Confirm button in the lower right-hand corner of the dialogue box.
Change the OctoPrint Global API Key #
Most EZPi images all ship with the same API key as we use an imager system here to speed up imaging of the SD cards. If you want to prevent someone from accessing the Octoprint instance on your EZPi via the API key you can change it from the web interface using the steps below.
Click the settings wrench at the top of the Web UI
Click API on the left side of the dialogue box that opens up and then click the refresh API key button
Confirm the API Key Change by clicking the Proceed button.
Save the new settings by clicking the Save button in the lower right-hand corner. This may take a second to not be greyed out as the system updates the API key.
Advanced – Change the SSH Account Password #
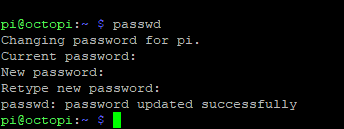
You should also change the default SSH account password that ships with the image. The default login is pi for the username and EzP1.ssh for the password.

To change the password for the SSH account, connect to your EZPi and login with the default credentials listed above. Once you are logged in sendpasswdand the system will ask you to confirm the current password and then enter in your new password. Once you confirm the new password it will be changed to the new one you entered.
Advanced – Regenerate new SSH Host Keys #
You can also regenerate the SSH host keys that the EZPi uses with the below commands when connected to the SSH terminal.
Elevate your SSH session to root by sendingsudo suIt will ask you to confirm your password and then your terminal will show root@octopi instead of pi@octopi.

Now we need to delete the existing SSH host keys by sending/bin/rm -v /etc/ssh/ssh_host_*

Once that completes we can re-generate new keys by sendingdpkg-reconfigure openssh-server

Exit the elevated root session by typingexitThen restart the SSH server by typingsudo systemctl restart ssh

Close out of your SSH session. When you reconnect you will get a warning about the Host keys changing. You can confirm the new key change with your SSH client and you are now using your newly generated keys.


